FIELD DENSITY TESTS OF SOILS, TREATED BASE COURSES AND WATER BOUND BASE COURSES (Kansas Test Method KT-13)
1. SCOPE
This method of test covers the procedure for measuring the “in-place” density of soils and granular base
courses. The density of a material is defined as the ratio of the mass of material to the volume of the
same mass of material. The tests described consist of measuring the volume that a given mass of soil or
base material occupies when it is in-place. KT-13 reflects testing procedures previously found inAASHTO T 191.
2. REFERENCED DOCUMENTS
2.1. Part V, 5.9; Sampling and Test Methods Forward2.2 KT-11; Moisture Tests2.3. KT-15; Bulk Specific Gravity and Unit Weight of Compacted Asphalt Mixtures2.4. KT-43; Moisture Content of Asphalt Mixtures or Mineral Aggregates - Microwave Oven Method2.5. AASHTO T 99 Test for Moisture-Density Relations of Soils2.6. AASHTO T 180; Moisture-Density Relations of Soils Using a 10 lb (4.54 kg) Rammer and an 18”(457 mm) Drop
2.7. AASHTO T 191; Density of Soil In-Place by the Sand-Cone Method (DELETED)
2.8. AASHTO T 205; Density of Soil In-Place by the Rubber-Balloon Method (deleted in 2000)3. APPARATUS3.1. General for all tests.
3.1.1. The balance shall conform to the requirements of Part V, 5.9; Sampling and Test Methods
Forward, for the class of general purpose balance required for the principal sample mass of the samplebeing tested.3.1.2. Oven capable of maintaining a uniform temperature of approximately 230°F (110°C) or a hot plate
with a buffer consisting of a pan of sand or thick steel plate placed between the drying pan and the flame.
If available, a microwave oven as described in KT-43 may be used.3.1.3. Equipment or shelter to protect balance from wind currents and the samples from exposure to the
sun and wind.3.1.4. Soil auger.3.1.5. Speedy Moisture equipment as described in KT-11.
3.1.6. Miscellaneous equipment including standard drying pans, trowel, large spoon, hammer, chisels,
heavy bladed knife, square point shovel and 12 in (300 mm) straight edge.3.2. Sand Density Apparatus.3.2.1. A cylindrical container of known volume usually between 0.05 and 0.10 ft3.3.2.2. A pouring container with a volume larger than the volume of the test hole. A one pound coffee can
with the rim bent into a “V” shape have previously been used as a pouring container, for shallow holes.3.2.3. Any clean, dry, free-flowing, uncemented sand having few, if any, particles passing the No. 200
(975 µm) or retained on the No. 10 (2.00 mm) sieves. In selecting sand for use, several bulk density
determinations should be made using the same representative sample for each determination. To be
acceptable the sand shall not have a variation in bulk density greater than 1%.3.3. Sand Cone Apparatus.3.3.1. The density apparatus shall consist of a 1 gal (4 L) jar and a detachable appliance consisting of a
cylindrical valve with an orifice 1/2 in (12.7 mm) in diameter and having a small funnel continuing to
standard G mason jar on one end and a large funnel on the other end. The valve shall have stops to
prevent rotating the valve past the completely closed positions. (See Figure 1 and Figure 2)NOTE: The apparatus1 describe here represents a design that has proven satisfactory. Other apparatus of
similar proportions will perform equally well so long as the basic principles of the sand-volume
determination are observed. This apparatus, when full, can be used with test holes having a volume of
approximately 0.1 ft3 (2.7 L). The base plate is optional; its use may make leveling more difficult but
permits test holes of larger diameter and may reduce loss in transferring soil from test-hole to container as
well as afford a more constant base for tests in soft soils. When the base plate is used it shall be
considered a part of the funnel in the procedures of this test method.3.3.2. Any clean, dry, free-flowing, uncemented sand having few, if any, particles passing the No. 200
(975 µm) or retained on the No. 10 (2.00 mm) sieves. In selecting sand for use, several bulk density
determinations should be made using the same representative sample for each determination. To be
acceptable the sand shall not have a variation in bulk density greater than 1%.3.4. Alternate Test Method Apparatus.3.4.1. Small pipe about 3/4 in diameter.3.4.2. 1/10 ft3 bucket.3.4.3. Funnel fitting small pipe in Section 3.4.1.
3.4. Rubber-Balloon Density Apparatus.
3.4.1. A Calibrated vessel designed to contain a liquid within a relatively thin, flexible, elastic membrane
(rubber balloon) for measuring the volume of the test hole under the conditions of this method. Theapparatus shall be equipped so that an externally controlled pressure or partial vacuum can be applied to
the contained liquid. It shall be of such mass and size that it will not cause distortion of the excavated test
hole and adjacent test area during the performance of the test. Provision shall be made for placing masses
(surcharge) on the apparatus. There shall be a volume indicator for determining to the nearest 0.00025 ft3(0.006 L) any change in volume of the test hole. The flexible membrane shall be of such size and shape
as to fill the test hole completely without wrinkles or folds inflated within the test hole, and its strength
shall be sufficient to withstand such pressure as is necessary to ensure complete filling of the test hole.NOTE: The description given above is intended to be non restrictive. Any apparatus using a flexible
(rubber) membrane and liquid that will measure the as-dug volume of a hole in soils or bases, under the
conditions of this method, to an accuracy of 1% is satisfactory.4. TEST PROCEDURE
4.1. Sand Density Method2.4.1.1. Determine the loose unit weight of sand in lb/ft3 (kg/m3) as follows:4.1.1.1. Fill the cylinder of known volume and mass to slightly overflowing by pouring the dry sand at a
uniform rate from the spout of the pouring container. The spout is held approximately 2 in (50 mm)
above the top of the container.4.1.1.2. Strike off the excess sand level with top of the container, being extremely careful to avoid jarring
the container during the process. Weigh the cylinder and sand. Conduct a total of three tests to determine
the loose unit weight of the sand and use the average value obtained when computing the “in-place”
density of the material being tested.4.1.2. Select the area where density is to be measured, determine and record the station, distance from
center line, and elevation as distance below the final grade.4.1.3. Trim off all raised or uneven spots to produce a smooth, flat surface not less than 18 in (450 mm)
square, using a square point shovel or other suitable tool, and remove all loose material from the area.4.1.4. Drill or cut a test hole through the depth of the material being tested and save all material removed,
protecting the sample from weather conditions which might change the moisture content.4.1.5. Weigh the material, record the mass, and dry the entire sample or a representative portion to
constant mass. Weigh and record the dry mass.NOTE: If the “Speedy” moisture tester is used to determine the moisture content, the procedure set forth
in KT-11 is followed. The dry mass of material is calculated as shown in Section 5.1.5 of this test
method.4.1.6. Determine and record the mass of the pouring container with a volume of sand somewhat greater
than the volume of the test hole.
4.1.7. Fill the hole level full of sand by pouring the sand at a uniform rate while holding the spout 2 in (50
mm) above the top of the test hole, as was done when calibrating the sand. The straight edge should beused to insure that the sand is level with the surface of the material surrounding the test hole.4.1.8. Weigh the pouring container and remaining sand and record the mass.4.2. Alternate Sand Density Method for Test Holes Exceeding Two Feet in Depth.4.2.1. Using a funnel, deposit the sand through a small pipe (about 3/4 of an inch in diameter).4.2.2. Let the pipe rest on the bottom of the hole and pour the sand into the pipe until it is full, then raise
the pipe about 8”. Continue to pour sand until the pipe is again full, and again raise the pipe the same
distance, being careful not to let the pipe settle in the sand. The number of sections of pipe used does not
affect the accuracy of the results, and each section may be removed as necessary. Care must be taken to
prevent the pipe from settling in the sand during this process.4.2.3. Use fine sand as described in Section 3.2. of this test method.4.2.4. The sand must be calibrated by the same method as it is deposited, that is, by setting a short section
of pipe in the bottom of the 1/10 ft3 bucket and pouring sand into the pipe until it is full. Raise it 8” and
continue to pour sand, keeping the pipe full, until the bucket is filled with sand.5. CALCULATIONS
5.1. Density of dry sand (DS):


6. SAND CONE METHOD
6.1. Determination of volume of jar and attachment up to and including the volume of the valve orifice as
follows:NOTE: The volume in this procedure is constant as long as the jar and attachment are in the same relative
position. If the two are to be separated, match marks should be made to permit reassembly to this
position.6.1.1. Weigh the assembled apparatus and record.6.1.2. Place the apparatus upright and open the valve.6.1.3. Fill the apparatus with water until it appears over the valve.6.1.4. Close the valve and remove excess water.6.1.5. Weigh the apparatus and water.6.1.6. Repeat the procedure described in Section 6.1.2 to 6.1.3 of this tests method, at least twice.
Convert the mass of water, in grams, to milliliters. The volume used shall be the average of three
determinations with a maximum variation of 3 mL.

6.2. Determination of Bulk Density of Sand.
NOTE: Vibration of the sand during any mass-volume determination may increase the bulk density ofsand and decrease the accuracy of the determination. Appreciable time intervals between the bulk density
determinations of the sand and its use in the field may result in change in the bulk density caused by a
change in the moisture content or effective gradation.NOTE: It is possible to determine the bulk density of the sand in other containers of known volume that
dimensionally approximate the largest test hole that will be dug. The general procedure used is that given
in Section 4.1.1 of this test method, for determining the density of dry sand. If this procedure is to be
followed it shall be determined that the resulting bulk density equals that given by the jar determination.6.2.1. Place the empty apparatus upright on a firm, level surface; close the valve and fill the funnel with
sand.6.2.2. Open the valve and keeping the funnel at least half full of sand, fill the apparatus. Close the valve
sharply and empty excess sand.6.2.3. Weigh the apparatus and sand. Determine the net mass of sand by subtracting the mass of the
apparatus.6.2.4. Calculate the bulk density of the sand as follows:

NOTE: This determination may be omitted if the procedure given in NOTE in Section 6.2 regarding
bulk densities is followed. When the base plate is used, it shall be considered a part of the funnel.NOTE: Where test holes of maximum volume are desired it is possible, after the bulk density
determination, to settle the sand by vibration and increase the mass of sand available shall be determined
by re-weighing.6.3.1. Put sand in the apparatus and obtain the mass of the apparatus and sand.6.3.2. Seat the inverted apparatus on a clean, level, plane surface.6.3.3. Open the valve and keep open until the sand stops running.6.3.4. Close the valve sharply. Weigh the apparatus with remaining sand and determine the loss of the
sand. This loss represents the mass of sand required to fill the funnel.NOTE: For each container/bag of sand there will be a unique cone correction and sand calibration factor.
Each sand-cone and matched base plate will also have a set of unique cone corrections and bulk sand
densities. If more than one sand-cone apparatus is available, the sand-cone and base plate should be
marked and the associated correction/density factors recorded.6.3.5. Replace the sand removed in the funnel determination and close the valve.6.4. Determination of Density of Soil In-Place.6.4.1. Prepare the surface of the location to be tested so that it is a level plane.6.4.2. Seat the inverted apparatus on the prepared plane surface and mark the outline of the funnel. Drill
or cut a test hole. Carefully save all material.NOTE: In soils such that leveling is not successful, a preliminary test shall be run at this point measuring
the volume bounded by the funnel and ground surface. This step requires balances at the test site or
emptying and refilling the apparatus. After this measurement is complete, carefully brush the sand from
the prepared surface.6.4.3. Seat the apparatus in the previously marked position, open the valve, and after the sand has stopped
flowing, close the valve.6.4.4. Weigh the apparatus and remaining sand. Determine the mass of sand used in the test.6.4.5. Weigh the material that was removed from the test hole.6.4.6. Mix the material thoroughly and secure and weigh a representative sample for moisture
determination.6.4.7. Determine the moisture content in accordance with KT-11.6.4.8. The minimum test hole volumes suggested in determining the in-place density of soil mixtures are
given in Table 1. This table shows the suggested minimum mass of the moisture content sample in
relation to the maximum particle size in soil mixtures.


7.1. The apparatus is generally not suitable for very soft soil which will deform under slight pressure or in
which the volume of the hole cannot be maintained at a constant value.7.2. Calibration Check of Volume Indicator.7.2.1. Verify the procedure to be used and the accuracy of the volume indicator by using the apparatus to
measure containers or molds of determinable volume that dimensionally simulate test holes that will be
used in the field. The apparatus and procedure shall be such that these volumes will be measured to
within 1.0% (see note below). Containers of different volumes shall be used so that calibration of the
volume indicator covers the range of anticipated test hole sizes.NOTE: The molds described in AASHTO T 99 Test for Moisture-Density Relations of Soils, and inAASHTO T 180 Test for Moisture –Density Relations of Soils or other molds prepared to simulate
actual test holes may be used. Where several sets of apparatus are used, it may be desirable to cast
duplicates of actual test holes. These sets should represent the range of sizes and irregularities in the
walls of test holes that will be encountered. These fabricated holes can be used as standards for the
calibration check of the volume indicator. This can be accomplished by forming plaster of paris negatives
in the test holes and using these forms for portland cement concrete castings. After removing the plaster
of paris negative from the concrete casting, the inside surface of the fabricated holes should be sealed
watertight and their volume determined as indicated in Section 7.2.2 of this test method.7.2.2. Determine the mass of water, in grams, required to fill one of the containers. Slide a glass plate
carefully over the top of the container in such a manner as to ensure that the container is filled completely
with water. Determine the temperature of the water in the container. A thin film of petroleum jelly
smeared on the top surface of the container will make a watertight joint between the glass plate and the
top of the container. Calculate the volume of the container, in ft3, by multiplying the mass of water, in
grams, used to fill the container by the unit volume of water, in milliliters per gram, at the observed
temperature, taken from Table 2 and dividing the result by 28.317 mL per ft3. Repeat this procedure until
three values are secured for the volume of the container having a maximum range of variation of 0.0001
ft3. Repeat the procedure for each of the containers to be used in the calibration check.

reading on the volume indicator. Transfer the apparatus to one of the containers and take the reading on
the volume indicator when the rubber-balloon completely fills the container. Apply pressure to the liquid
in the apparatus until there is no change indicated on the volume indicator. Note and record the pressure.
Depending on the type of apparatus, this pressure may be as high as 5 psi (49 kPa). It will usually be
necessary to add mass (surcharge) to the apparatus to prevent it from rising. Note and record the total
amount of mass added. The difference between the initial and final readings of the volume indicator is
the indicator volume value for the container. The membrane may be withdrawn from the container by
applying a partial vacuum to the liquid in the apparatus. Repeat the procedure for the other containers.NOTE: If the calibration container or mold is airtight, it may be necessary to provide an air escape, since
the rubber membrane can entrap within the container and cause an erroneous volume measurement. After
the volume of the container has been determined with water prior to the insertion of the rubber balloon,
small air escape-holes may be provided by placing lengths of small-diameter string over the edge of the
container and down the inside wall slightly beyond the bottom center. This will permit air leakage during
the filling of the container with the membrane. If such a procedure is necessary in the laboratory, it may
be necessary to use a similar procedure on tightly bonded soil in the field.NOTE: Before any measurements are made, it may be necessary to distend the rubber balloon and
remove air bubbles adhering to the inside of the membrane by kneading.NOTE: In field tests the additional mass (surcharge) will increase the stress in the unsupported soil
surrounding the test hole and will tend to cause it to deform. Using a base plate may reduce the stress.
7.4. Test Procedure
7.4.1. Prepare the surface of the material to be tested so that it is reasonably plane. Set the balloondensity apparatus on the prepared surface and maintain its position by driving nails through the holes inthe base plate and into the soil.7.4.2. Place a surcharge on the apparatus and apply the same pressure to the liquid as was applied during
the calibration check tests. Read and record the volume of liquid shown on the volume indicator.7.4.3. Apply sufficient vacuum to the inside of the chamber to withdraw the liquid and balloon into the
chamber.7.4.4. Remove the apparatus from the base. Drill or cut a test hole through the hole in the base plate and 4
to 6 in (100 to 150 mm) into the material to be tested. Carefully save and determine the mass of all
material removed. The hole shall be of the minimum volume shown in Table 3.7.4.5. Protect the sample from weather conditions which might change the moisture content. Record the
wet mass of all material removed from the test hole.7.4.6. Determine the moisture content in accordance with KT-11.7.4.7. Place the balloon density apparatus over the test hole in exactly the same position as was used for
the initial reading and apply the same surcharge mass to the apparatus and the same pressure to the liquid
as was applied during the initial reading.NOTE: Attention is called to instances in weak soils where the pressure applied to the liquid in the vessel
can deform the test hole to such an extent as to give an erroneous volume. In such instances, the
apparatus shall be modified and recalibrated using less surcharge mass and pressure on the liquid in the
vessel, or it may be necessary to resort to another method such as the sand cone method already described
in this specification.7.4.8. Read and record the volume of liquid shown on the volume indicator.7.4.9. Withdraw the liquid and rubber membrane from the test hole and into the container by developing a
vacuum inside the container with the vacuum phase of the pump.7.5. Calculations.7.5.1. Calculate the volume of the test hole, which is the difference between the two volume readings as
determined in Sections 7.4.2 and 7.4.8.
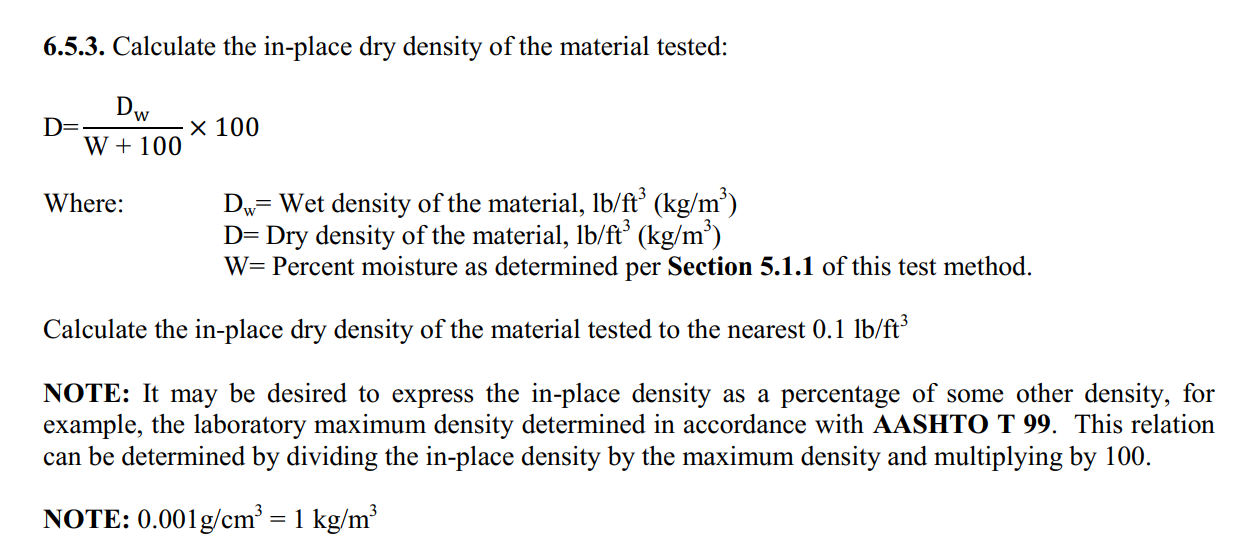
7.5.2. Calculate the wet density, Dw, of the soil removed from the test hole, lb/ft3 (kg/m3) as follows:


FIELD DENSITY TESTS OF SOILS, TREATED BASE COURSES AND WATER BOUND BASE COURSES (Kansas Test Method KT-13)
 Reviewed by Komsan4KhmerHD
on
February 26, 2018
Rating:
Reviewed by Komsan4KhmerHD
on
February 26, 2018
Rating:
Reviewed by Komsan4KhmerHD
on
February 26, 2018
Rating:


